

|
|
Changing the brake disks is an extremely easy addition to replacement of brake pads.
This article is a slot in extra to my articles on changing front and rear brake pads. When you fit disks, just as with pads, you must always replace them in pairs (both front wheels or both rear wheels at the same time). You should fit new brake pads with the new disks.
Things you will need:
 | Everything I've listed on the brake pad pages | |
| A 14mm spanner or socket wrench | |
| An appropriate pair of brake disks |
Installation:
|
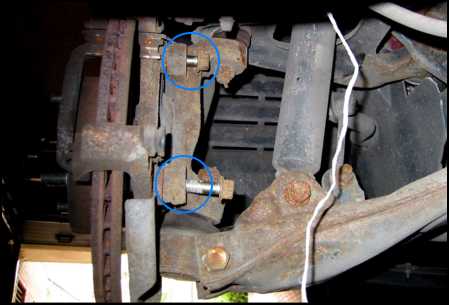
(1) Read the instructions that came with the new disks - Mine came with an anti-rust coating that had to be cleaned off with white spirit. (2) Follow the steps on my brake pad pages until you have got the old brake pads out. (3) Locate and remove the two 14mm bolts holding the caliper onto the car. (As in image - this shows a front wheel, but the rear wheels are very similar) (4) Carefully disentangle the caliper from the disk (5) Pull off the disk. If it's old and rusted on, this might need some persuasion with a rubber mallet, but for me, the disks slid off with no problem at all. (6) Use a wire brush and cloth to carefully clean the disk hub (both the flat part, and the sides of the central bit around which the disk sits) to get rid of any dirt or rust flakes on it. The surfaces need to be flat and smooth to ensure the disk lines up straight when fitted. (7) Slide on the new disk. Take care not to cover the braking surface of the disk with greasy fingermarks. If you have directional (slotted or drilled) disks, make sure you use the correct disk on each side of the car - the manufacturer's instructions should make this clear. (8) Check the run-out. You need to check that the disk is lined up straight on the hub, or it will have a slight "wobble" (side to side movement as it spins) which will translate into juddery braking and damage to the disks over time. You should ideally check the amount of run out with a proper dial meter, but below is my cheap tool-free alternative (note: use this approach at your own risk). Ensure the disk is seated flat against the hub and put two opposing wheel nuts back on to hold the disk firmly in place while you spin it. Place a flat, stable object close to the face of the disk, so you can see a tiny gap between the disk and object (as small as possible without them actually touching). Turn the disk while keeping your head as still as possible (lean it against the car), and you will be able to see the gap widening and narrowing between them as the disk spins. This effect needs to be minimised. Take the disk off, rotate it by one hole, and check the run out again. There are 4 rotational positions you can try, and you should be able to find one with undetectable or barely detectable movement (you're after less than 0.1 millimetres). If you can't seem to eliminate the runout, then take the disk off, re-clean the mating surfaces, then try again. (If you are in any doubt, then leave the disk fitted where the run out is minimised and take the car to a qualified mechanic to be checked and corrected if necessary - it'll be safe to drive, but if you drive with too much run out the disk will be slowly ruined). (9) Carefully slide the caliper back into position over the disk (10) Replace the 2 bolts to reattach the caliper to the car ...continue with the brake pad fitting instructions... step 6 (front) or step 13 (rear)... |
|
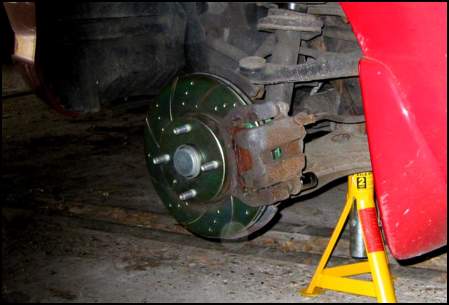
Results:
Ooooh, shiny!
Fitting time:
When fitting brake pads, each disk only takes about 5-10 minutes extra to fit
June 2002
If you have any comments about this site, please email us. Our operators are standing by.
 |