

|
|
Rear brake pads don't wear as fast as the front ones, but after 3 sets of front pads, my rears finally gave out, so I have just replaced them. The process is very similar to changing the front brake pads, except for 2 major differences:
 | The rear wheels are off the ground, so using the handbrake and leaving the car in gear won't stop it rolling away! Take extra care with wheel chocks! | |
| The caliper piston on the rears must be wound back and then adjusted with a 4mm hex-key, which is a bit trickier than the process for the fronts |
Things you will need:
| New pads! Make sure you get the right ones (1.6 and 1.8 MX5s have different brakes). Always replace the pads on both rear wheels together | |
| A 4mm hex-key (Allen key) | |
| Copper grease (available from Halfords etc) | |
| Spanner or Socket wrench (For Mk2 1.8i you'll need 14mm and 10mm) | |
| Wheelbrace, Jack, Axle stands, Wheel chocks | |
| 2m of String | |
| A flat-bladed screwdriver may be handy |
Installation:
Don't just take my word for it... read the brake-pad article
on miata.net for a good description of the process. Here's my illustrated checklist of the steps to take, which
may help clarify the details of the miata.net article:
|
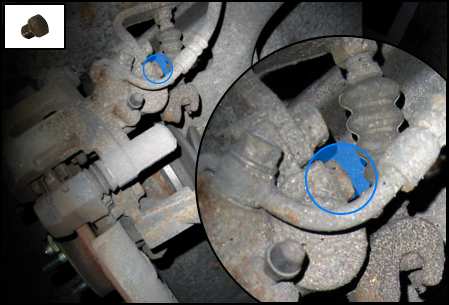
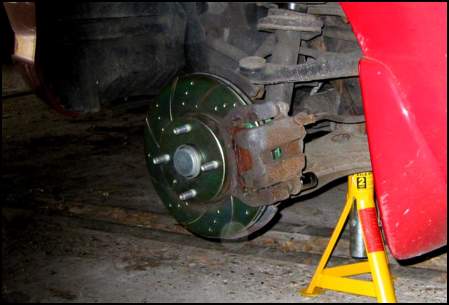
(1) Put some chocks securely in front and behind both front wheels (because the handbrake and gears only affect the rear wheels, there is nothing else to stop the car rolling off the stands and falling on you). (2) 'Crack' (loosen) the rear wheel nuts while the wheels are still on the ground (3) Jack up the car & get it safely onto some axle stands (4) Remove rear wheels (5) Before you take the caliper off, you'll need to wind back the caliper piston a bit. This is done by 'undoing' a 6mm hex-key bolt on the back of the caliper. To gain access to the bolt, a 14mm cap nut must be removed. Stick your head into the wheel arch and look straight down (as in image; you can see the brake disk in the bottom left; the centre of the car is towards the top right). The circled nut is one of a pair of 14mm nuts where the handbrake cable (corrugated rubber thing) attaches to the caliper. One nut holds the handbrake-cable bracket on, the other is the nut to remove. |
| |
|
(6) Remove the cap from your brake master cylinder.
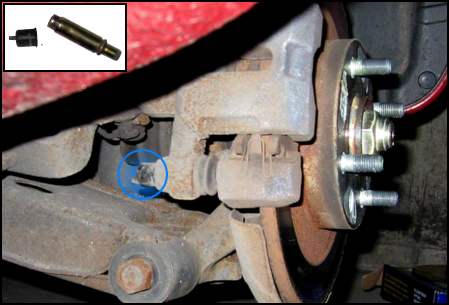
See my article on front brakes for a picture of this (7) Insert your 4mm hex key into the hole you removed the cap-bolt from, and you should be able to locate it into the hex nut. 'Unscrew' this nut to back-off the caliper piston. After a few turns you should be able to pull back the brake pad away from the disk surface and see a widening gap. (8) Find the plastic cap on the bottom rear of the caliper (see image), and simply pull it off to uncover the caliper pin. (9) Remove the 10mm caliper pin - it unscrews a little and then pulls out. |
| |
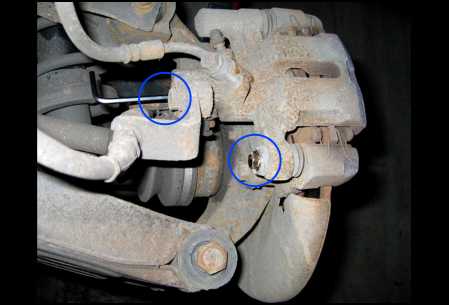
| This image shows the rear side of the caliper looking upwards, with the caliper pin and the hex-bolt (with my hex key in it) highlighted. |
| |
|
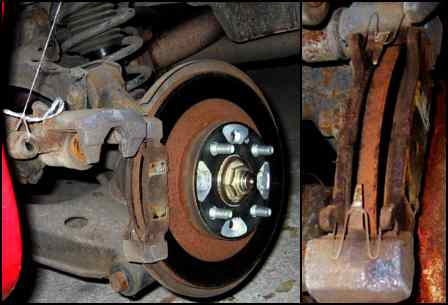
(10) Holding the pads in place to stop them springing out, carefully rotate the caliper back and
up until it clears the pads. (The handbrake cable and brake hose make this much springier than the front caliper). (11) Tie the caliper up with string. (I had to tie it to the hard-top mounting points on top of the car to be able to successfully hold the caliper up - now that I've replaced the pads a few times, I don't bother with the string any more, but it helps on the first go). (12) Remove the W springs at the top and bottom, and the pads should lift out easily. The top spring clip will probably fall out with the pads, but it's easily replaced as the new pads go in. |
| |
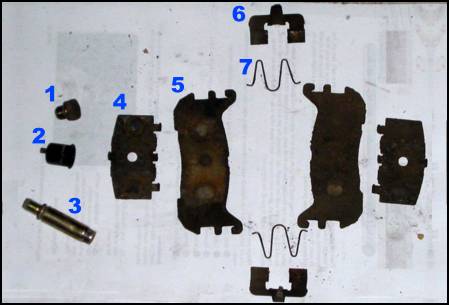
You should now have a nice little collection of parts (see numbered items in image)
(13) Find your new pads (check all 4 - some pads may have loops of metal on one end to cause a squeal when the pads are near the end of their life - if so, make sure you get 1 pad with a loop and 1 pad without. I fit the one with a loop on the back side) |
| |
|
(14) Apply some copper grease to the back of each pad. Attach the backing plates.
Apply some more copper grease to the back of the backing plates. Take care to avoid getting
grease onto the working surfaces of the pads and disk. (15) Insert the pads, making sure the top and bottom spring clips are back in place too. (16) Lower the caliper back down over the pads. If it won't go, then you will need to further bruise your fingers widing the piston back with your hex key. If you are fitting new pads and discs at the same time you may reach the end of the hex-key travel before you can get the pads in - I just ditched a backing plate to make it all fit together properly tat first time. Once the discs had worn slightly, fitting the next set of pads was much easier. (17) Put the 'W' clips back on so that they put pressure on the spring clips. (18) Now you must adjust the pads. Ensure the handbrake is off. Lock the disk in place with a couple of wheel nuts. You should be able to spin the disk easily with your fingers. (19) 'Do up' the hex key until the pads grab the disk and you can no longer turn it by hand. Now 'undo' it about a third of a turn. The disk should turn fairly easily (though it might make a slight rubbing noise, and will continue to do so until the brake pads are bedded in) (20) Apply a little grease to, & then replace, the pin on the bottom of the caliper (21) Replace the plastic cap over the pin (22) Replace the cover bolt over the hex-key hole (23) Replace wheels. Remember to tighten the nuts after you have lowered the car off the jack (24) Pump your brakes several times to get everything properly seated (25) Put brake master cylinder cap back on (26) Take a tentative test drive. Take care to brake gently for the first 100 miles to bed the pads in. |
|
Fitting time:
Rear brake pads take longer than fronts, so take me about 35 minutes each
January 2004
If you have any comments about this site, please email us. Our operators are standing by.
 |