

|
|
See also changing the rear brake pads.
There are plenty of good articles on the net about changing brake pads, and it's a really easy job, but I thought I'd mention my experience to encourage those who are unsure whether or not to try it for themselves, and so I have a good reference to remind me what to do next time I have to do it myself! It's scary to start alone on a job on a safety-critical component, but this really is a simple thing to do, and there's not a lot that can go wrong.
I decided to fit EBC Green Stuff pads which seem to be generally well liked on MX5s, supposedly better (if slightly quicker wearing) than the stock pads, and a bit cheaper. At main dealer prices, I saved £52 by fitting the pads for myself, and although the job took about an hour and a half in total the first time, I can now do both front wheels in about 40 minutes. Oh, and unlike my Mazda dealer, I won't forget to put all the springs in!
Things you will need:
(As it's difficult to drive to Halfords without wheels or brakes when you realise you need something more ;-)
 | New pads! Make sure you get the right ones (On Mark1 MX5s the 1.6 and 1.8 MX5s have different brakes. Apparently on Mark2 models the brakes are now the same. Mark 2.5 and Mark 3 also have different brake pad types). Always replace the pads on both front wheels together | |
| Copper grease (available from Halfords etc) and possibly silicon grease (Mark 3) | |
| Spanner or Socket wrench (14mm, 17mm, 21mm will cover all models of MX-5) | |
| Wheelbrace/Torque Wrench, Jack, Axle stands, Wheel chocks | |
| Possibly a flat-bladed screwdriver & a G-Clamp |
Installation:
Don't just take my word for it... read the brake-pad article
on miata.net for a good description of the process. Here's my illustrated checklist of the steps to take, which
may help clarify the details of the miata.net article:
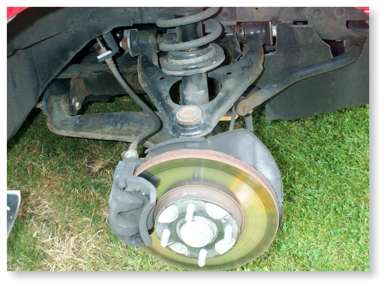
(1) 'Crack' (loosen) the front wheel nuts while the wheels are still on the ground (2) With the handbrake on, and the car in gear, put some chocks around the wheels just to be sure, jack up the car & get it safely onto some axle stands. (I position these under the mounting points for the suspension, as you know they are designed to hold the weight of the car - avoid any panelled areas and the underside of the engine). You can do one corner of the car at a time, but make sure you put 1 axle stand in just as a safety measure in case the jack fails. (3) Remove front wheel | |
 (4) Replace a couple of the wheel nuts to hold the disk in place
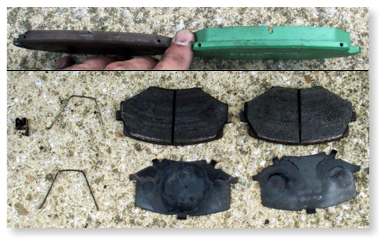
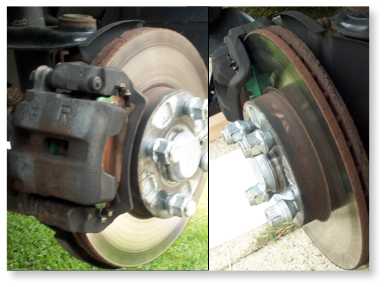
(5) Remove the bolt (slider pin) at the bottom (rear) of the caliper. Holding the pads in place to stop them springing out, carefully rotate the caliper back and up until it clears the pads. You should end up with (see image - left to right) a squeal shim, 2 springs (Mk1/2 only), 2 pads and 2 shims (backing plates). If the metal end-clips (not shown) fall out with the pad, replace them in the caliper. (6) Get the caliper up out of the way (safest is to tie it back with string) | |
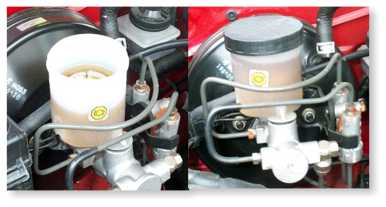 (7) Remove the cap from your brake master cylinder (see picture) to allow the brake fluid to return
to it as you do step (8).
(7) Remove the cap from your brake master cylinder (see picture) to allow the brake fluid to return
to it as you do step (8).(8) Compress the brake caliper piston back - I am usually able to do this with a tight squeeze of my fingers (I have to hold the pressure on for about 20 seconds and the piston gradually sank back in), but you may find it is necessary to use a G-Clamp to squeeze it back. (Some sites recommend levering the piston with a screwdriver, but this uneven pressure can damage the mechanism). Take care that the brake fluid in the master cylinder doesn't overflow, as it'll do nasty things to your paint - the images show the amount the level of mine rose (for 2 front wheels - almost a centimetre for each wheel). | |
 (9) Remove the shims from the backs of the old pads and clean them
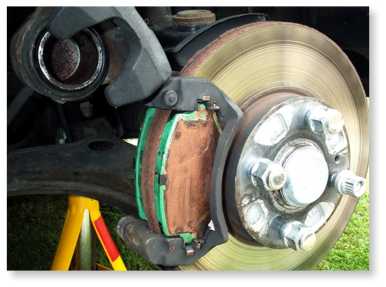
(10) Smear a small amount of copper grease on the back of the new pads (be careful not to get any on the front/braking side!) If you have separate shims, clip them on) (11) Clip the squeal shim over the locating-lug on the end of the rear pad (12) Apply copper grease to the back of the shims (13) Slot the pads into place, (Mk2: add the springs; there are no springs in Mk3), and slide the caliper back over them | |
 (14) Sparingly apply grease to, & replace, the slider pin on the bottom of the caliper (If the pin is all-metal (Mk2) then
rubber grease or copper grease is appropriate; if the pin has a plastic/rubber sheath around it (Mk2.5 big brake or Mk3) then you
must use silicone grease - other grease will cause the rubber to swell and the slider will seize up)
(14) Sparingly apply grease to, & replace, the slider pin on the bottom of the caliper (If the pin is all-metal (Mk2) then
rubber grease or copper grease is appropriate; if the pin has a plastic/rubber sheath around it (Mk2.5 big brake or Mk3) then you
must use silicone grease - other grease will cause the rubber to swell and the slider will seize up)(15) Replace wheels. Remember to tighten the nuts (110Nm) after you have lowered the car off the jack (16) Pump your brakes several times to get everything properly seated (17) Put brake master cylinder cap back on (18) Take a tentative test drive. Take care to brake gently for the first 100 miles to bed the pads in. |
Fitting time:
My first time took an average of 41 minutes for each wheel, as I was careful and took time to take lots of photos!
Now it takes me less than 20 minutes per wheel
Results:
After owning the same car for over 12 years (85,000 miles driving including 20 or so track days), I have found EBC GreenStuff
pads and EBC Turbo Groove disks excellent. They produce significantly less brake dust than stock pads, seem to wear
less on track, definitely bite better, showed no signs of brake fade, and do not glaze over on the track
(they work perfectly on leaving the track whereas the stock pads would always take about 2 weeks (200 miles)
of normal driving before they returned to full effectiveness). The turbo-groove disks are a bit noisy (the dimples
cause a buzzing noise as you drive) but you get excellent braking form cold even in wet conditions, and once they
warm up, the braking power is unbelievable.
Update: With a heavier Mk3 and 16 years ownerwship behind me I have found a track where GreenStuff were not good enough (the Lotus Test Track, which has very heavy braking zones - 120mph down to about 30). With a heavier car, a turboed MX-5, and/or a demanding track, you may find YellowStuff is needed. This is still good for road use but a bit more expensive.
September 2001-August 2016
If you have any comments about this site, please email us. Our operators are standing by.
 |